- Posts: 126
- Thank you received: 102
Ship Models
- Pete Nolan
- Offline
- Junior Member
-

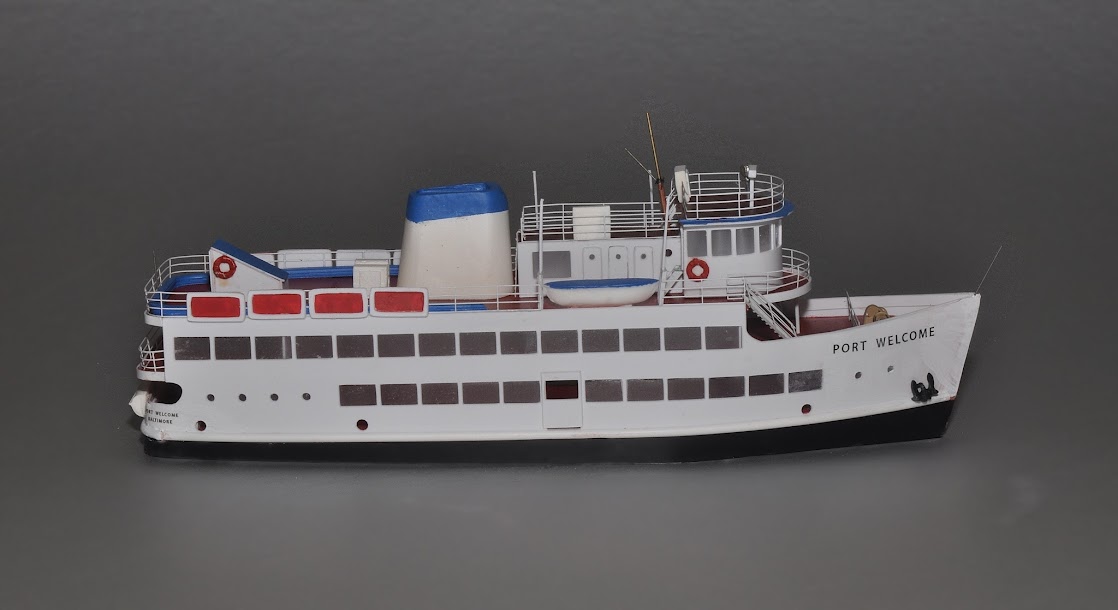
Here's the N scale version of a party ship! She is perfect for small harbors, as similar party ships sailed from docks at small coves, on rivers, and on lakes.
The Port Welcome sailed Baltimore's inner and outer harbors for nearly 30 years (1960—1989), carrying up to 400 partiers at a time. Since then it's had a rather checkered history as a restaurant in Detroit, a casino cruise in Massachusetts, and today is at pier in Florida. The N Scale version here is priced at $135 plus shipping for a complete kit, including custom railings and fittings, and $550 plus shipping for a built up.
The Port Welcome in N scale, all of 9.4" (240 mm) long but as detailed as any larger ship.
The main and second (01) decks are see-through, as is the pilot house! Add your own interior details, from tables and chairs, to the concession stand, to lots of people. I'm proud of the techniques I've developed to be able to do this.
Yes, those are custom N scale railings, stairways, life rafts and life boats, along with custom built davits, and a cast resin stack—all designed for this N scale ship. Other details such as anchors, bitts and life rings are from the finest suppliers of pewter or brass castings. There's also the wrap-around seating on the top deck, storage lockers, masts and flag staffs.
Those are custom lifeboats and dinghy, hot out of my molds. Notice the stack has a hollow shield on the top, which I manufactured from many layers of styrene, each reduced incrementally by the computer. The anchor windlass is custom built from eleven separate parts.
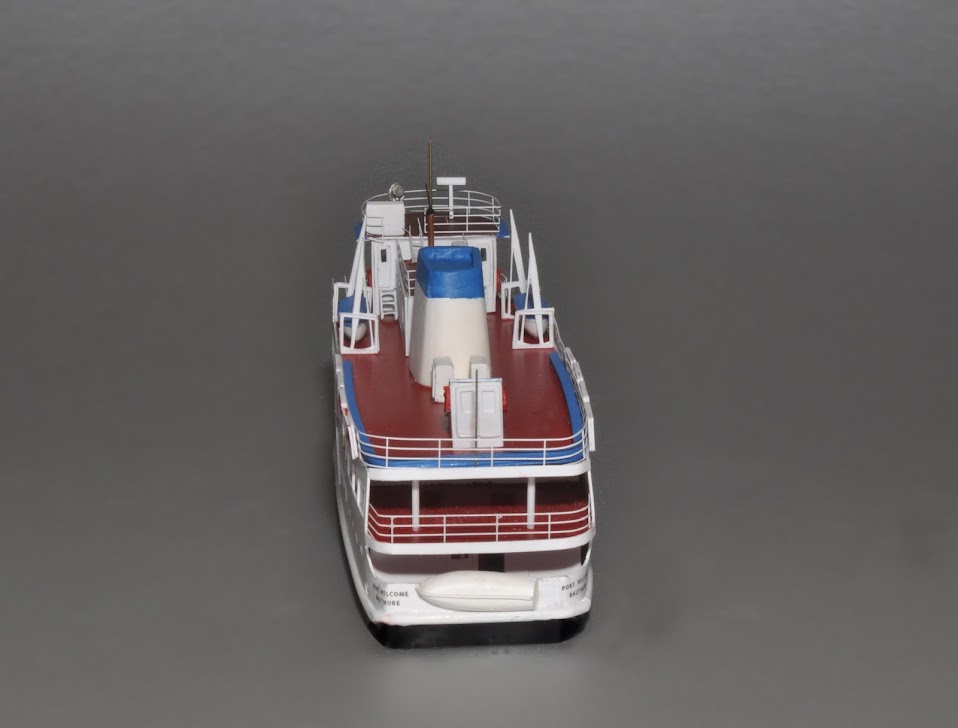
Here's a head-on view.
There's plenty of space to add a polaris (compass stand), engine room telegraph, steering gear, chart tables, etc. The Port Welcome had radar, and a 24" searchlight, each modeled on the pilot house roof.
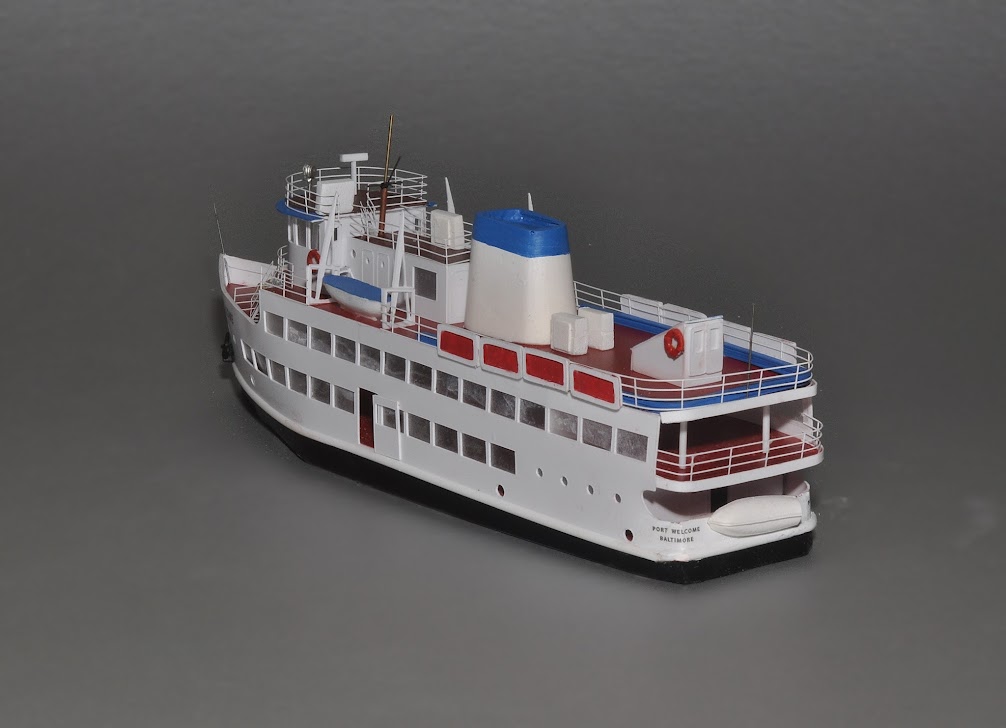
Another view from the stern, showing the rear verandas, and my new N scale dinghy.
I built this from pictures and diagrams from one of her captains, Fred Ladd.
One more view, from the 3/4 stern. While not the sleekest party boat that ever sailed, I think it's rather handsome in its own way.
I'll produce only 20 kits for this Fall, and my schedule for built ups is filling up quickly, so order now if you'd like one for Christmas! Order cut-off for guaranteed delivery in 2013 is October 15. I can accept Paypal and credit card orders. Best to contact me at This email address is being protected from spambots. You need JavaScript enabled to view it..
That October 15 deadline is getting really serious. Reservations for the Edna G.tugboat in N scale (not even announced yet), the 375' modern feeder container ship in Z, and the T2 container ship in N are filling up my schedule. I'm selling every ship I build, but could use a few orders to fill out my build calendar, as I do move between Ohio and Alabama, and knowing what's on order helps me plan the moves. Customers are ordering models even before I announce them! So let meknow what you might be interested in ordering, or we're looking at March 2014 for delivery.
Please Log in or Create an account to join the conversation.
- southernnscale
- Offline
- Premium Member
-

- Posts: 453
- Thank you received: 188
Please Log in or Create an account to join the conversation.
- Fred
- Offline
- Yard Master
-

- Posts: 1221
- Thank you received: 157
Please Log in or Create an account to join the conversation.
- southernnscale
- Offline
- Premium Member
-

- Posts: 453
- Thank you received: 188
Since you where her captain. You got to have her in your collection of ship! This one needs a glass case big enough to put the Sea under her! she will be a real cover girl then!!
Please Log in or Create an account to join the conversation.
- Fred
- Offline
- Yard Master
-

- Posts: 1221
- Thank you received: 157
Please Log in or Create an account to join the conversation.
- southernnscale
- Offline
- Premium Member
-

- Posts: 453
- Thank you received: 188
Please Log in or Create an account to join the conversation.
- Fred
- Offline
- Yard Master
-

- Posts: 1221
- Thank you received: 157
Fred
This is the bow decal applied for the Bi Centenial-1976---Interesting note here. As we placed the seal on the bow, we heard gun shots, and dove for cover. There was an attempt on the mayor's life and I believe his secretary was killed, and others wounded.
Please Log in or Create an account to join the conversation.
- tealplanes
- Offline
- Dispatcher
-

- Posts: 774
- Thank you received: 64
Fred wrote: Pete- I haven't checked recently- have you completed the directions for topside.
Fred
Fred, ask any kit manufacturer and they will likely all agree that making directions for any kit is the worst aspect of kit manufacturing. When I try to write any 'how to' narrative, I have a difficult time putting it down on paper even though my brain knows what the thought is I am trying to convey. You almost have to write the directions for the lowest IQ to cover everyone.
Now don't get me wrong, I'm not insinuating that you are on the lower end of the IQ numbers.......I think I get to claim that fame.
Please Log in or Create an account to join the conversation.
- JamesTraction
- Offline
- New Member
-

- Posts: 15
- Thank you received: 6
James
Please Log in or Create an account to join the conversation.
- Fred
- Offline
- Yard Master
-

- Posts: 1221
- Thank you received: 157
Please Log in or Create an account to join the conversation.
- tealplanes
- Offline
- Dispatcher
-

- Posts: 774
- Thank you received: 64
Please Log in or Create an account to join the conversation.
- Fred
- Offline
- Yard Master
-

- Posts: 1221
- Thank you received: 157
Please Log in or Create an account to join the conversation.
- tealplanes
- Offline
- Dispatcher
-

- Posts: 774
- Thank you received: 64
While I am not going to build your boat kit of yours due to not having any suitable water scene to use it on, I did read through your instructions as posted and I found them to be very interesting and thorough, at least to my understanding. That boat kit would be a challenge, but I think anyone taking care could turn out a very nice product.
I just wanted to tell you I really enjoyed reading the instructions on line and now let's see how good a job Fred does with your kit.
Ok Fred, you are up to bat.....and the cameras are rolling. :O)
Please Log in or Create an account to join the conversation.
- Pete Nolan
- Offline
- Junior Member
-

- Posts: 126
- Thank you received: 102
I'm not afraid of writing and photo-ing instructions; I was a writer/photographer/producer for 45 years. I'll admit I'd rather get lost in the geometric intracacies of developing a new ship than writing or marketing my stuff, but I do eventually bite the bullet and churn the instruction out.
I do have two tugs in N scale coming out soon; I'll see if I can get the Z scale versions out soon. These have cast resin hulls, so I need to make masters in Z, mold them, then start casting them.
I did not have good photos of the bow of the Port Welcome when I developed the kit. The curved effect at the top would be difficult to achieve, and make the bow much more difficult to build, even for me.
What is a beginner, intermediate, or expert kit is really a subjective question. I don't offer some of my ships as kits because they are difficult for me to build, and I think near impossible for most non-marine modelers to build. The sleeker the ship, the more difficult it is to build, especially the bow and stern. The Port Welcome has only a little bit of sweep, and no camber on the main or 01 decks, so I could make it a kit. Ships like a WWII destroyer have both sweep and camber, and are very tough to build.
Fred, got your box today. Holy moley! I'll respond via private email tomorrow. I owe you big time!
Please Log in or Create an account to join the conversation.
- Pete Nolan
- Offline
- Junior Member
-

- Posts: 126
- Thank you received: 102
As for glues, I use my own mix of 75% MEK and 25% toluene to bond plastics. I guess Testor's Liquid glue would be fairly close: I was just tired of paying $4 for a small bottle. I haven't tried the MEK substitute, methyl chloride. I use Krystal Klear for windows--both to bond acetate to plastic, and as its own "liquid" windows. I use thin superglue (ACC) for bonding cast resin, brass, and other materials.
I have a lot of small pieces of styrene around, so I use about 1" x 2" squares for ACC. I just put a few drops in the middle, then use a micro-applicator, or just dip the end of a part in the puddle. For railings, it sometimes works best to swipe a length of railing through the puddle and start at one end and work around.
Pete Nolan
nscaleships.com
Please Log in or Create an account to join the conversation.


